

Having a repeatable process you can do practically on autopilot is the key to creating content quickly. And if you didn’t realize you needed to be creating so much content as a business owner — welcome, you’re not the only one!
Organic marketing, and Pinterest marketing in particular, requires a steady stream of new content to be effective, but I don’t know many creative business owners who have time to churn out content like they’re getting paid by the word.
So what’s a girl to do? Sim👏pli👏fy.
You need a simple, streamlined Pinterest workflow that you can implement quickly so you can move on to the rest of your to-do list.
As a Pinterest manager, my Pinterest workflow allows me to manage multiple clients with ease, getting them the results they care about without wasting time or brainpower on tedious tasks. I’m sharing what I’ve learned through much trial and error to help you improve your own Pinterest workflow! (Or create one if you haven’t yet!)
Why You Need a Workflow for Your Pinterest Marketing
You might have heard this phrase from habit icon James Clear: “You do not rise to the level of your goals. You fall to the level of your systems.”
While I may not agree with everything Mr. Clear has to share, he’s got this one right. The systems you have in your business and in life are the foundation of ease and flow. Or, if they’re not up to par, your systems might be the cause for needless friction.
You have a system for clearing your inbox, for automatically onboarding clients, for exporting logo files… why wouldn’t you have a workflow for your Pinterest marketing?
From the outside, it seems unnecessarily complicated. Why would you create a capital-W Workflow for something that should be simple?
In fact, taking the time to develop an efficient Pinterest workflow is what allows Pinterest marketing to be simple in the first place.
When you’re able to quickly create and schedule pins without getting lost in your files looking for that one picture or having to do keyword research before writing every single pin title, you can check Pinterest off your to-do list and move on.
I’ll be completely honest with you — the most successful creators on Pinterest are publishing a lot of content. You can still be successful with fewer pins, but if you want to make Pinterest your number one lead source, you need a workflow that will help you scale your Pinterest content creation!
Luckily, your Pinterest workflow doesn’t have to be some overdrawn, multi-step process.
How to Simplify Your Pinterest Workflow
In case it’s not clear by now, I’m definitely not going to pretend that content creation is as easy as every digital marketer makes it sound. But it doesn’t have to involve complicated steps or tools, either.
By taking the time to set up a Pinterest workflow and content creation system that works for me, I’m able to make Pinterest marketing as sustainable as it is effective. There are three main aspects to a speedy Pinterest workflow. Let’s break them down!
Pinterest Workflow Organization in Canva
Set up your Canva brand kit
If you’re using Canva to create your pin graphics (which I recommend), setting up your brand kit will help you stay on brand without having to constantly reference your brand guidelines or copy down hex codes.
Add all the fonts and colors you regularly use in your other graphics or on your website to your brand kit. Don’t forget to upload any custom fonts that aren’t available in Canva!
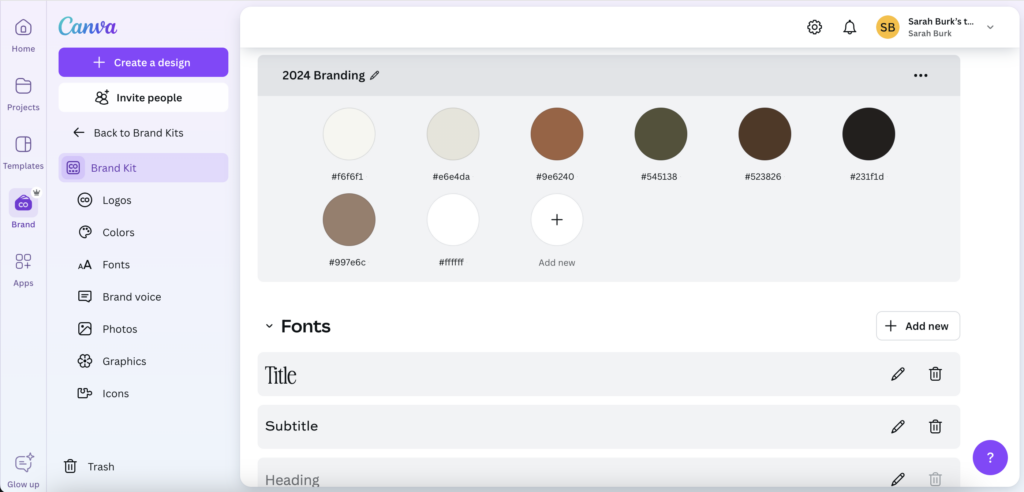
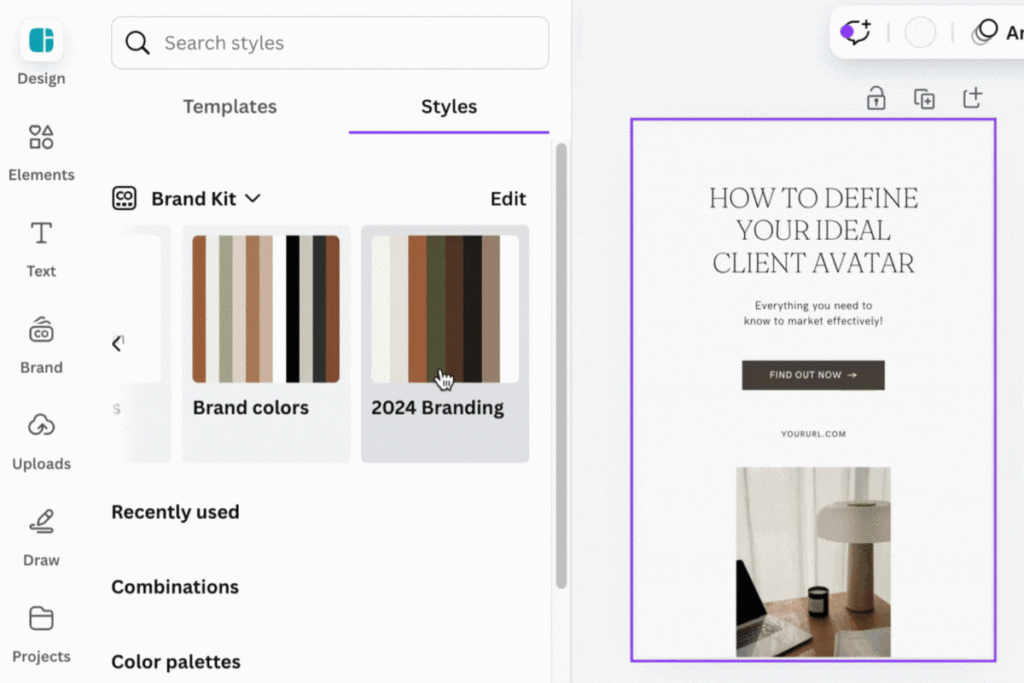
Having your brand kit set up also makes it easy to customize any pin templates you use in the future. You can either customize the templates element-by-element, or use the “Styles” feature in the “Design” tab to apply your brand guidelines to the entire design.
Organize your brand assets in Canva
One of the most important things you can do to streamline your Pinterest workflow is have an organized Canva account. When creating pin graphics, there are a lot of different assets and elements you’ll be working with. You want those to be as easy to find as possible.
One way to prepare your Canva account for an easier Pinterest workflow is to upload and organize your brand assets.
You can either upload your brand assets within the preset folders in your brand kit — logos, photos, graphics, icons — or create your own folders within Canva.
Some things you’ll want to upload include different variations and colors of your logos, brand photos, and any other brand elements, icons, or illustrations. If you have any patterns or textures you want to use in your designs, upload those, too!
If you have any products, lead magnets, or portfolio work that you want to show off in your pin graphics, you should also go ahead and add those to Canva folders!
This is the folder system I create for my clients as part of my Pinterest workflow, and I encourage you to swipe it for your own use:
- Create a brand kit
- Add brand colors
- Add brand fonts, uploading fonts if necessary
- Upload logos and icons
- Create a Canva folder for the client with the following subfolders
- Brand Photos
- Brand Videos (if applicable)
- Stock Photos
- Portfolio (if applicable)
- Create individual folders within for each project
- Upload screenshots/files
- Products
- Create individual folders within for each product
- Upload screenshots and/or mockups
- Lead Magnets
- Create individual folders within for each freebie
- Upload screenshots and/or mockups
It might seem like overkill now, but I promise you it won’t when you’re looking for that one cover image for a freebie you want to have a mockup pin graphic for.
Curate on-brand stock photos
I know I just told you to upload any brand photos to Canva, but when you’re designing Pinterest pin graphics, you’ll also want to have stock photos you can use in your pins!
Stock photos make for great backgrounds or accent images in your pin graphics, but you don’t want to have to go scouring the depths of Canva or Unsplash every time you need one for a design.
If you have access to any paid stock photo libraries — like Haute Stock, for example — go ahead and download all of the ones you think you might use or that are on brand and upload them into your “Stock Photos” folder on Canva.
There are also plenty of free places to find good Pinterest stock photos. Pexels and Unsplash are two of the most popular and have a diverse range of photos.
While you could search those sites individually, download the photos, and then reupload them into your stock photo folder, there’s actually an easier way to do this without even leaving Canva…
How to add Canva stock photos to a folder
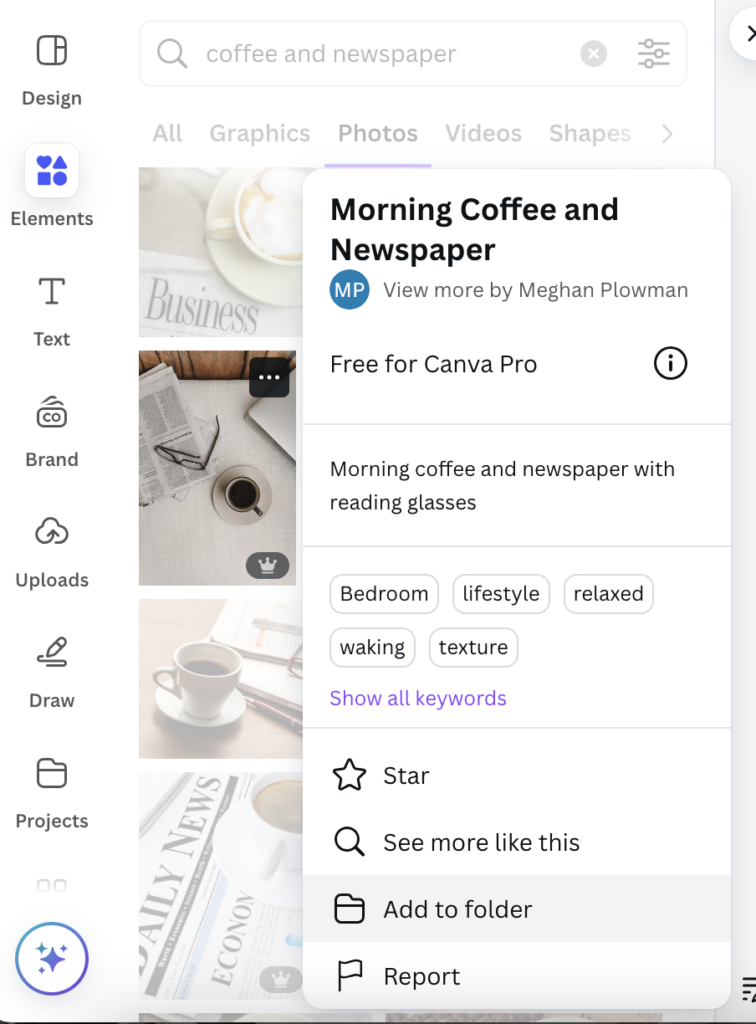
Did you know that you can add graphics and photos from Canva’s library into folders on Canva? It’s a serious life-changer if you haven’t tried it yet!
Canva Pro members have access to Canva’s entire library of stock photos, which includes a big selection from Pexels, Unsplash, and more of the common stock photo resources! While searching within Canva’s photos, if you find one you like and want to add to your stock photo folder, it’s super easy to do.
Click the icon with the ellipsis that appears when you hover over an image, then click “Add to folder.” Select the folder you want to add the image to, and click “Add to folder” to confirm the addition.
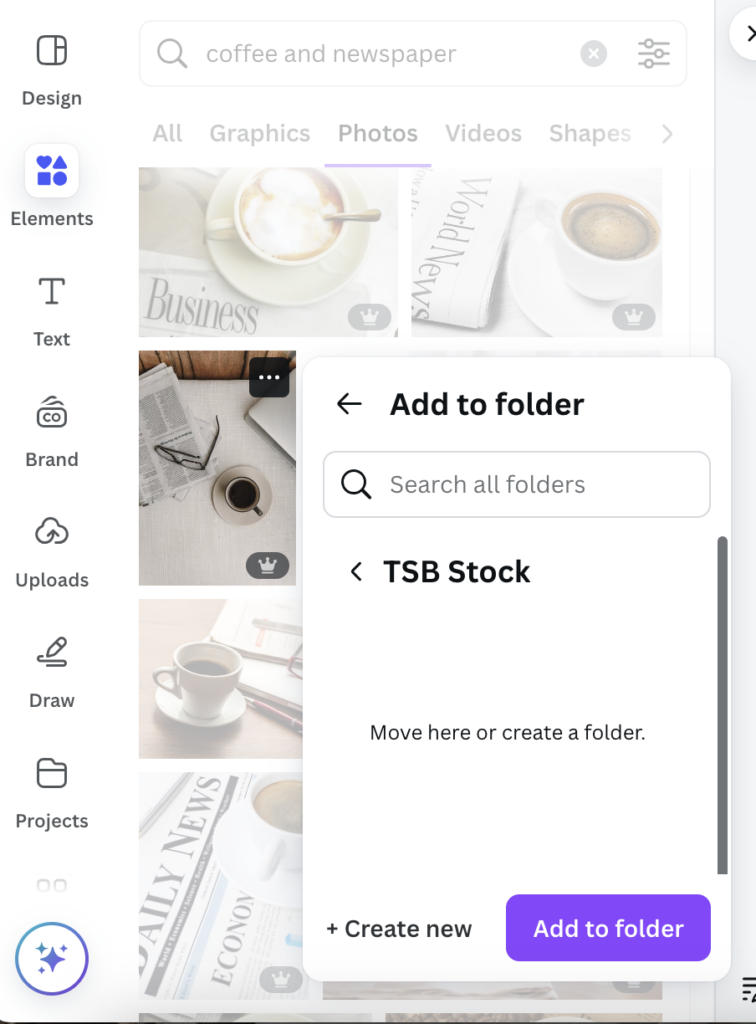
You can repeat this process with images, videos, and even different graphic elements if you want to use the same style of arrow, for example.
Design pin templates you can replicate
If it’s not evident by now, creating a simplified Pinterest workflow is all about doing the foundation work to save your future self time. It involves a bit of setup and templatizing, but it’s so worth it in the end.
One of the steps that takes the most time in my personal Pinterest workflow is designing pin graphics. Even with all the assets prepared, design is still a time-consuming process!
Now imagine if I had to create these pin graphics from scratch every single time? Nooooo way.
Pinterest pin templates are designed to make your Pinterest workflow speedier and they help ensure that all your Pinterest content looks on-brand and cohesive!
Whether you use the free pin templates on Canva, create your own pin templates, or purchase Pinterest pin templates from another source, the odds are that you’ll still need to do some tweaking to make them fit your brand.
I prefer to collect all my templates in one Canva file, customize them to my client’s branding, and then save that file as a brand template.
That way, whenever I’m creating pin graphics for that client, I have one place I can go to access all of the templates and they’re already set for me to plug in titles and images.
Don’t overwrite old pin designs
This Pinterest workflow tip is one I wish I’d learned earlier, so hopefully I can save you some grief!
When I first started creating content for clients, I’d work in one giant Canva file. Any time I needed to create new pins, I’d just go in and delete the previous pin content to put in the new ones.
There’s nothing technically wrong with this, and if it works for you, great! But, in my work with clients, we’ll often revisit blog posts we’ve pinned before and create new images for them.
With my previous way of doing it, I’d have to redesign all those pins from scratch, changing some colors or images, or swapping out titles along the way.
Now, I create a new Canva file any time I’m working on a fresh batch of pins. You could do this for each piece of content you’re pinning, but since I structure my Pinterest workflow on a monthly cadence, each client will have a new Canva file for each month.
The huge benefit to that is that I have all of the original designs that I can pull into a new Canva design and easily make small edits to get a brand new pin.
This is such a small switch, but it’s truly so helpful, particularly for evergreen content or products you’ll be creating a lot of pins for over time!
Setting Up Your Pinterest Foundations
When you’re creating Pinterest content and developing your Pinterest workflow, having the foundations of an optimized Pinterest account is essential. It might not be part of the workflow itself, but it does save you time in the long-run.
Grab the free Pinterest Blueprint here to build your own Pinterest foundations and know your account is standing on solid ground!
Tracking Your Pinterest Content
Okay, I know I said that Canva organization was the most important piece to simplifying your Pinterest workflow, but this one might actually be even more important…
Having a system to keep track of your content overall, your Pinterest content, and all of the moving pieces related to those pieces of content, will change your Pinterest workflow for the better.
One of the biggest challenges to managing multiple clients’ Pinterest accounts for me was knowing when Tailwind queues would start running out or when we needed to create new pins for an evergreen offer. That’s a lot of information to try and keep straight inside one brain!
So I started externalizing that info into a Pinterest Content Tracker.
Inside my Airtable tracker, I have one table for all of a client’s content — blogs, products, lead magnets, landing pages, etc. I also have a table for all of their boards, and then I create monthly pin planning tables, which is where I write my pin copy and plan out the schedule for that month.
The great thing about setting up this content tracking system in Airtable is that all of the different tables can connect to each other. Where it particularly comes in handy is with planning target keywords for different pieces of content.
Plan your keywords in advance
Inside the content tracker table, I have a column for what relevant keywords I want to use for pins about each piece of content. That data then gets pulled over into the monthly pin planner when I connect the piece of content to a record.
What that means is that when I’m sitting down to write out all my pin titles and descriptions, I already have a curated list of keywords to reference while I’m writing!
Keep track of what you’ve pinned and when
Also inside the content tracking table is a status tracker and a row to add the “Date Last Pinned.” These two pieces of data let me see at a glance what content has or hasn’t been pinned yet, and how long ago a piece of content last had pins created for it.
Write your pin copy outside of your scheduler
For the longest time, I’d write my pin copy (titles and descriptions) as I was scheduling pins. Just right inside Tailwind. But then, if I wanted to go back and reference what I’d written before, I’d have to scroll through the client’s Pinterest profile, find the pin, and copy and paste it.
By using a Pinterest content tracker like this in your Pinterest workflow, you’re writing the pin copy in the tracker, making it easy to grab or reference in the future!
It’s also super helpful to keep track of what you’ve done and what you’ve tried when it comes to your Pinterest marketing. If you’re really looking to be strategic about your Pinterest marketing, having records like these to look back on is great!
You can create a Pinterest content tracker yourself, or you can purchase the Pinterest content tracking template right here!
The content tracking system includes templates for Airtable, Google Sheets, and Notion, so you can continue working in your preferred platform and adapt the templates to your own Pinterest workflow!
Taking the time to develop your own Pinterest workflow is worth it!
I know I’ve just spent the past 1,800-or-so words telling you how to optimize your Pinterest workflow based on what works for me, but that’s just it. It works for me. It’s totally possible — and completely valid — that what works for me might not work as well for you!
Finding the right systems and tools to help you streamline your Pinterest workflow might take some time and fine tuning, but it’s well worth the effort.
I fully believe that the more you can systematize, the easier Pinterest marketing gets. And the easier Pinterest marketing gets, the more you’ll want to do it, and the more you’ll reap the benefits of it.
If you have a basic structure to lean back on — your Pinterest foundation, best practices, and organization — everything else is just finishing touches.
My goal is to make Pinterest as simple as it can be for you, while still getting the results you deserve. That’s why I’ve filled my Newsstand with a slew of resources to support the DIY Pinterest marketer at every stage.
Need help finding your keywords? I’ve got pre-researched keyword banks ready for you to grab-and-go.
Tired of searching for non-cringe Pinterest pin templates? Obviously I’ve got those, too, in a variety of different styles, whether you lean more editorial and neutral or bold and colorful!
And of course, if you need some help setting up your Pinterest tracking system, the Pinterest Content Tracker has templates for you to get started with!


")

